Google Analytics and Tag Manager with Ionic and Cordova apps
Recently we did a tracking implementation for a client with an online service that had both a standard website and a mobile iOS app. The app, however, was hybrid app based on the Cordova framework. It’s a technology that allows you to use standard web technologies to develop cross-platform mobile applications. And while this solution offers optimal flexibility and quick release cycles from a technological perspective, it also provides some headaches when it comes to analytics.

The hybrid app problem
Because a hybrid app is not a real native app, you can’t use the standard mobile tracking SDK’s created for iOS or Android. The app essentially runs inside a “webview” which makes these SDK’s useless. Also, while a hybrid app does resemble many of the characteristics of a web app, there are a number of differences between both environments that ensure that a standard Google Analytics implementation will just not fly.
To counter this problem there are a number of Google Analytics plugins available for Ionic and Cordova. But, while these plugins solve one problem, they also create another. By their nature, they are tightly integrated with the respective platforms and so are bound to the mobile app’s update cycle. You would need to wait for an app update every time you want to make changes to the tracking implementation, and as a digital analytics agency we prefer to work with a tag management solution that gives us full control over the tracking.
The Google Analytics Measurement Protocol
After playing around some possible solutions to our problem we found that implementing Google Tag Manager along with the Google Analytics Measurement Protocol offered a clean technical integration and optimal flexibility. Using this approach the tracking implementation and web logic are loosely coupled and a universal data layer can be used to send the data not only to Google Analytics, but to a variety of vendors.
This solution works just like your regular Tag Manager and Google Analytics implementation, but here we’ll replace the standard Google Analytics code with a JQuery javascript snippet that uses to GA Measurement Protocol to send a pageview or an event to Google Analytics. Our Ionic / Cordova app just needs to fill the data layer with properties and events, and the rest is handled in Tag Manager.
A step by step guide
To demonstrate this solution I will run you through every step required in order to send a pageview and an event from a boilerplate Ionic app to Google Analytics via Tag Manager.
Step 1: Create a boilerplate Ionic app
For our proof of concept we used the Ionic 2 tab template. You can user whatever Cordova based app you have at a hand, but if you want to follow exactly along with the steps, use the following command to bootstrap the app:
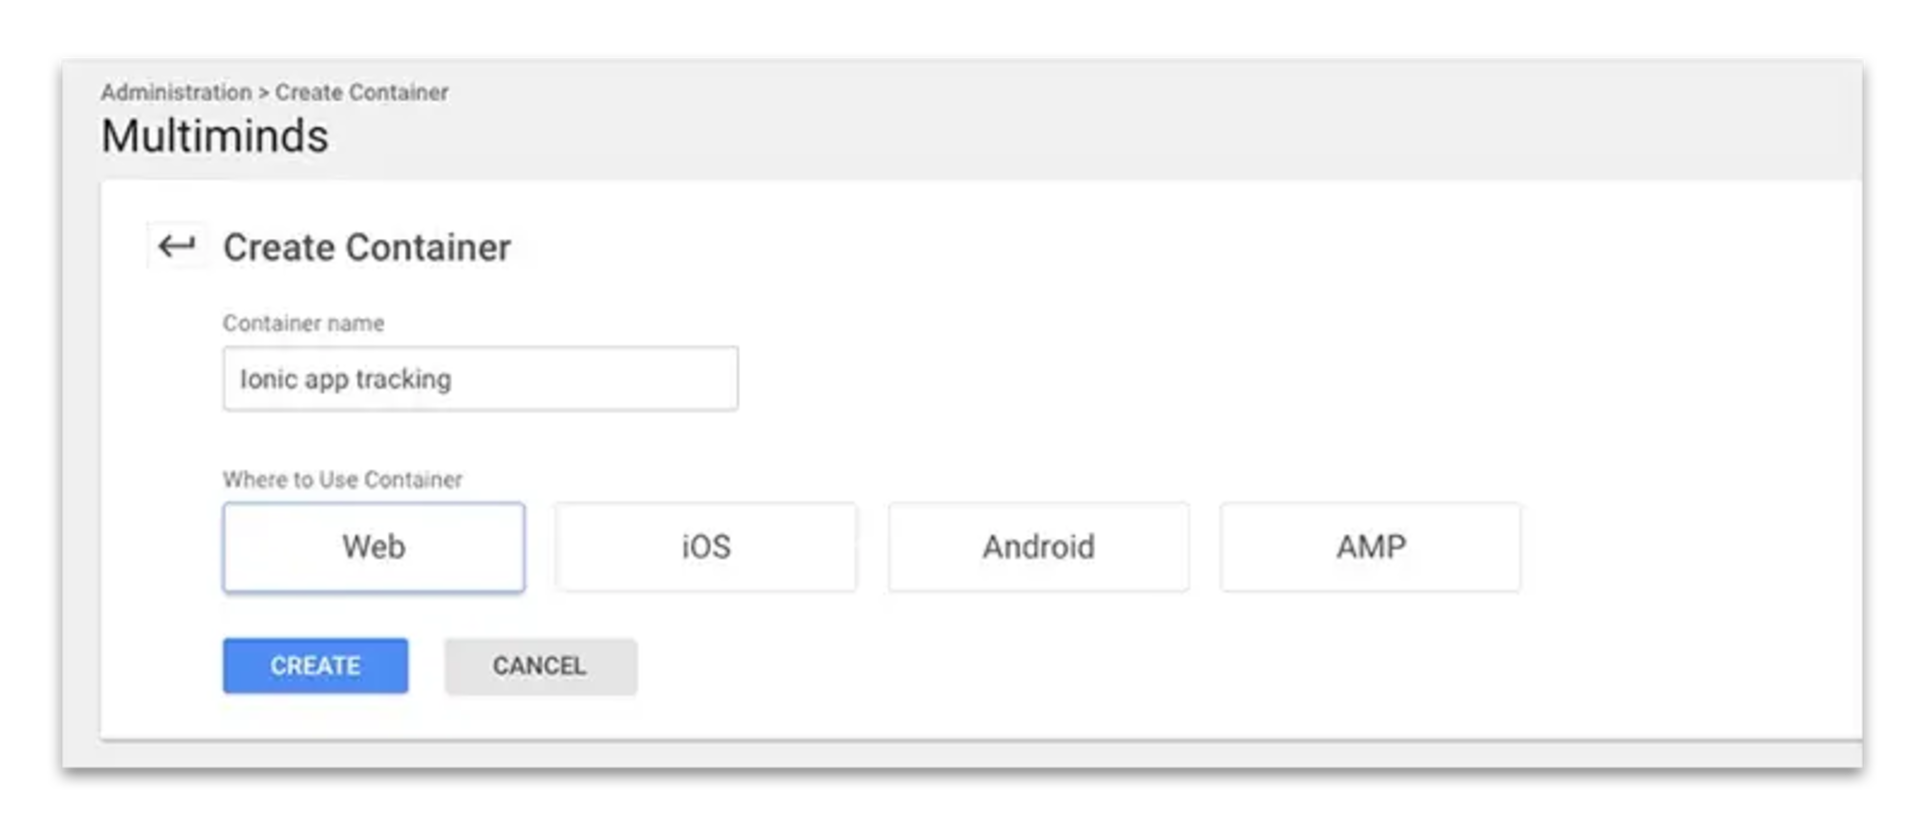
ionic start --v2 myApp tabsLog into your Google Tag Manager account and create a new container. You should select “web” on the question where to use the container. This is because Tag Manager will run inside the webview of or mobile app.
Step 2
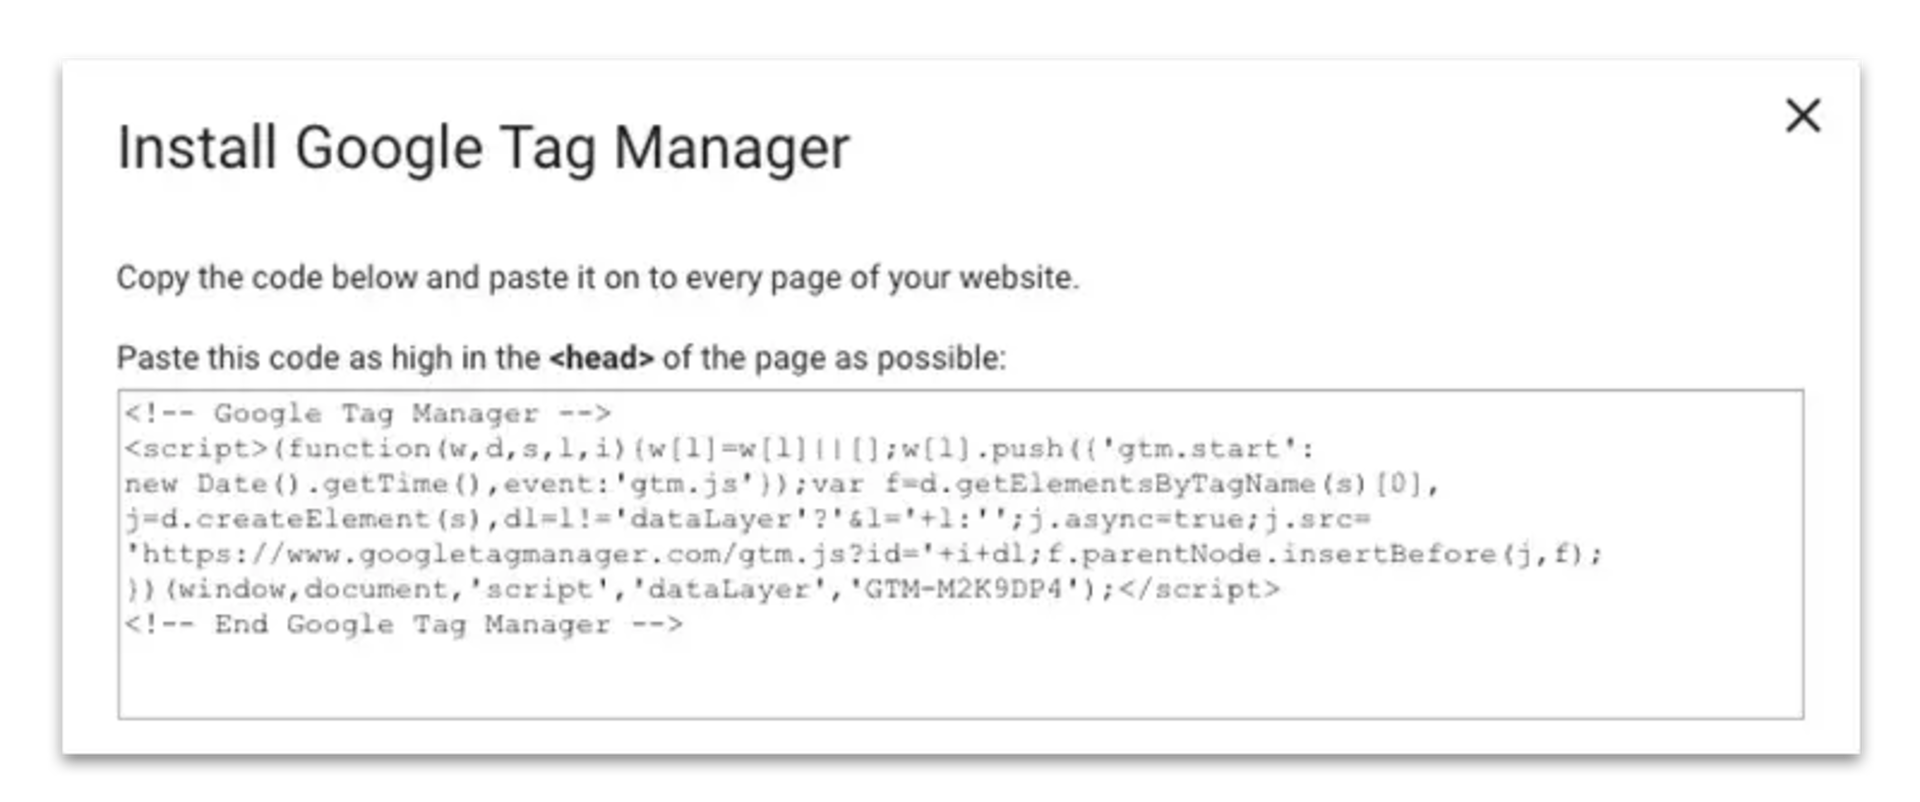
After you created the container you will get 2 code snippets. In our case we will only need the first snippet. The second is used in case the client doesn’t have javascript, and without javascript our app wouldn’t run at all, so it’s no use copying this over. Copy the first script and paste it after the opening tag in our index.html file (src/index.html). And while we’re here, if you don’t already use JQuery, add it before the Tag Manager script.
It’s important to know that as long as we don’t actually publish our container this script will throw a 404. So don’t freak out for now when this happens.
<head>
<meta charset="UTF-8">
<title>Ionic App</title>
<meta name="viewport" content="width=device-width, initial-scale=1.0, minimum-scale=1.0, maximum-scale=1.0, user-scalable=no">
<meta name="format-detection" content="telephone=no">
<meta name="msapplication-tap-highlight" content="no">
<link rel="icon" type="image/x-icon" href="assets/icon/favicon.ico">
<link rel="manifest" href="manifest.json">
<meta name="theme-color" content="#4e8ef7">
<script src="https://ajax.googleapis.com/ajax/libs/jquery/3.1.1/jquery.min.js"></script>
<!-- cordova.js required for cordova apps -->
<script src="cordova.js"></script>
<link href="build/main.css" rel="stylesheet">
<!-- Google Tag Manager -->
<script>(function(w,d,s,l,i){w[l]=w[l]||[];w[l].push({'gtm.start':
new Date().getTime(),event:'gtm.js'});var f=d.getElementsByTagName(s)[0],
j=d.createElement(s),dl=l!='dataLayer'?'&l='+l:'';j.async=true;j.src=
'https://www.googletagmanager.com/gtm.js?id='+i+dl;f.parentNode.insertBefore(j,f);
})(window,document,'script','dataLayer','GTM-N29PL2Q');</script>
<!-- End Google Tag Manager -->
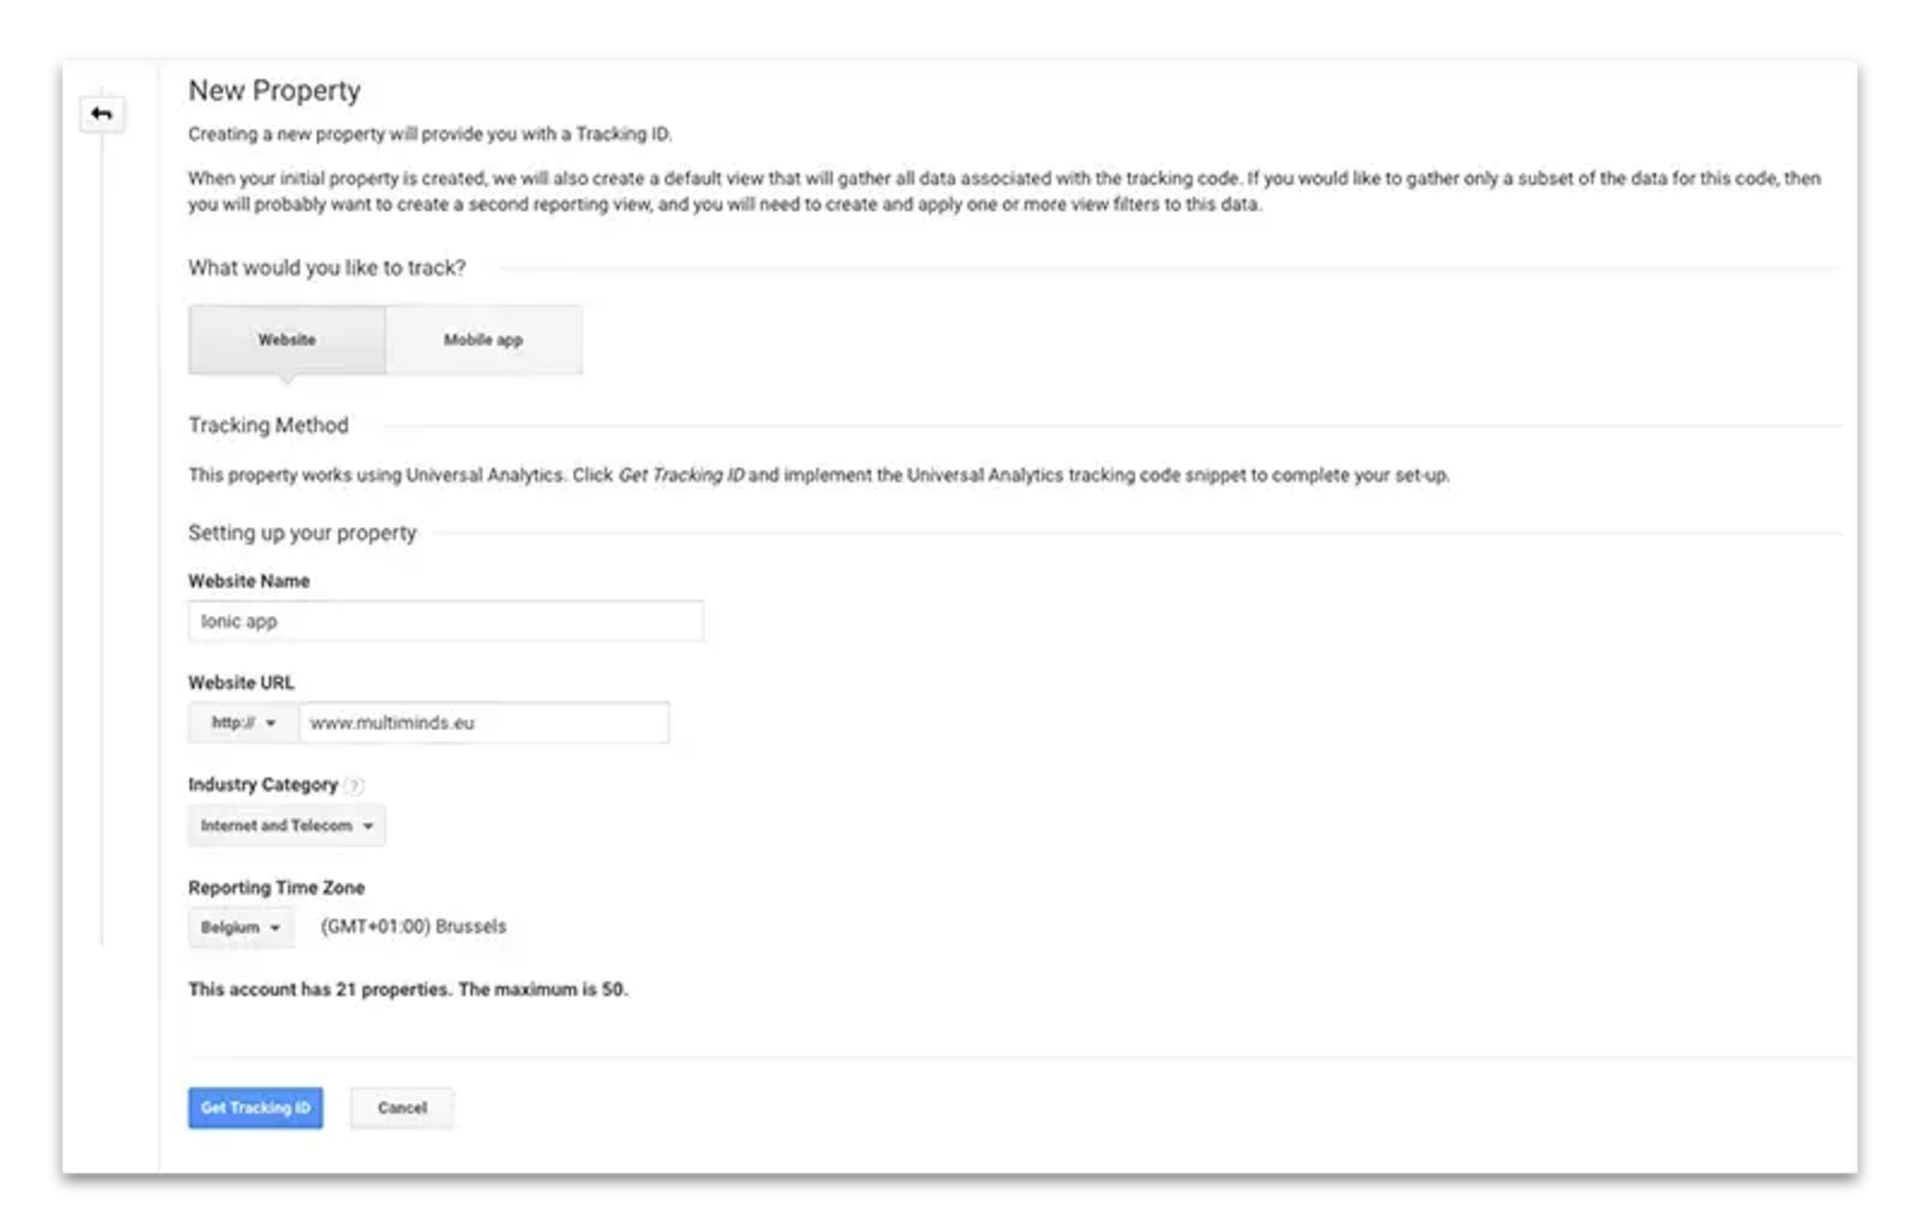
</head>Step 3: Create a new Google Analytics property
Log into your Google Analytics account and create a new property. Here it’s important to select “Website” as the entity you want to track. All other options don’t really matter and you can input whatever fits your needs. After the property is created go fetch the tracking ID and copy it.
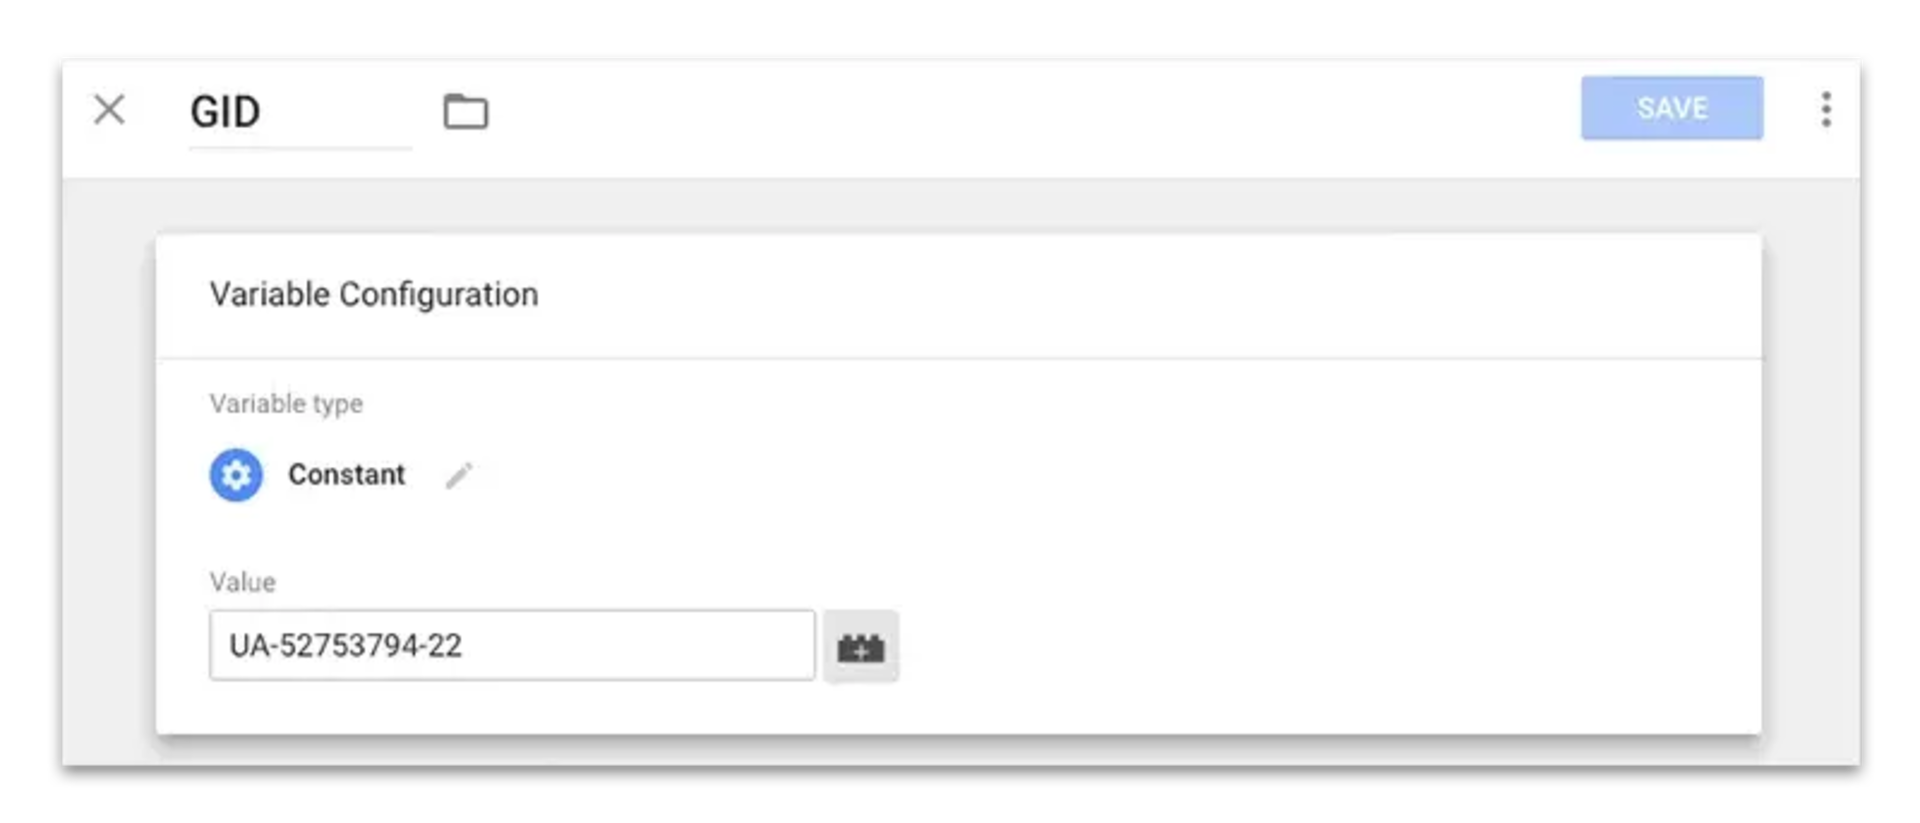
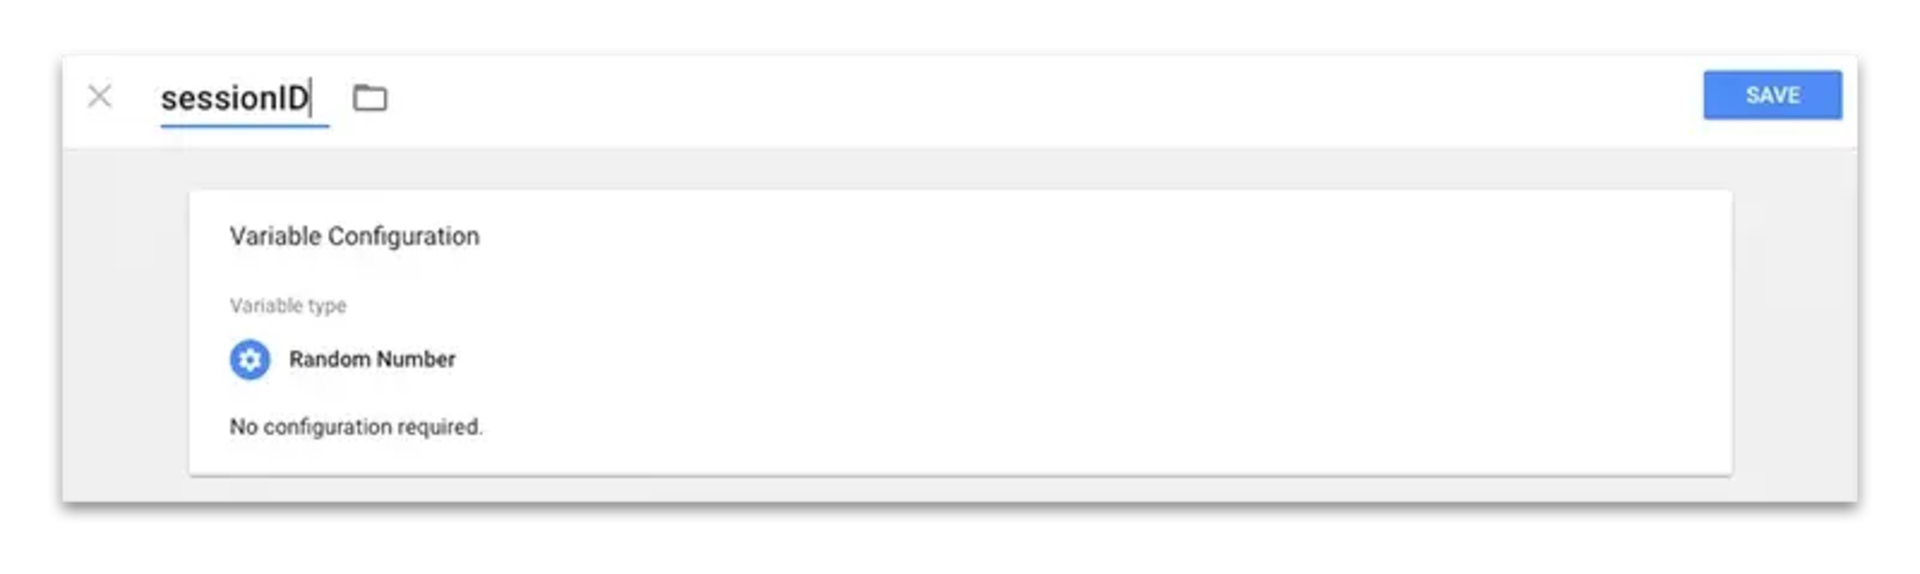
Step 4: Create a data layer variable for your tracking ID and a random session ID
Go back to Tag Manager and create a new variable. The variable should be of type “constant”. Paste the Google Analytics Tracking ID as the value and name the variable “GID” (or anything else really)
When using the standard Google Analytics script, an anonymous user id is created to manage sessions and identify returning users. However, if you use the Measurement Protocol you need to supply that ID yourself. In most real-life case you’d probably have a user ID ready, but as this is just a simple boilerplate app so we’ll create a random variable in Tag Manager as the anonymous user ID.
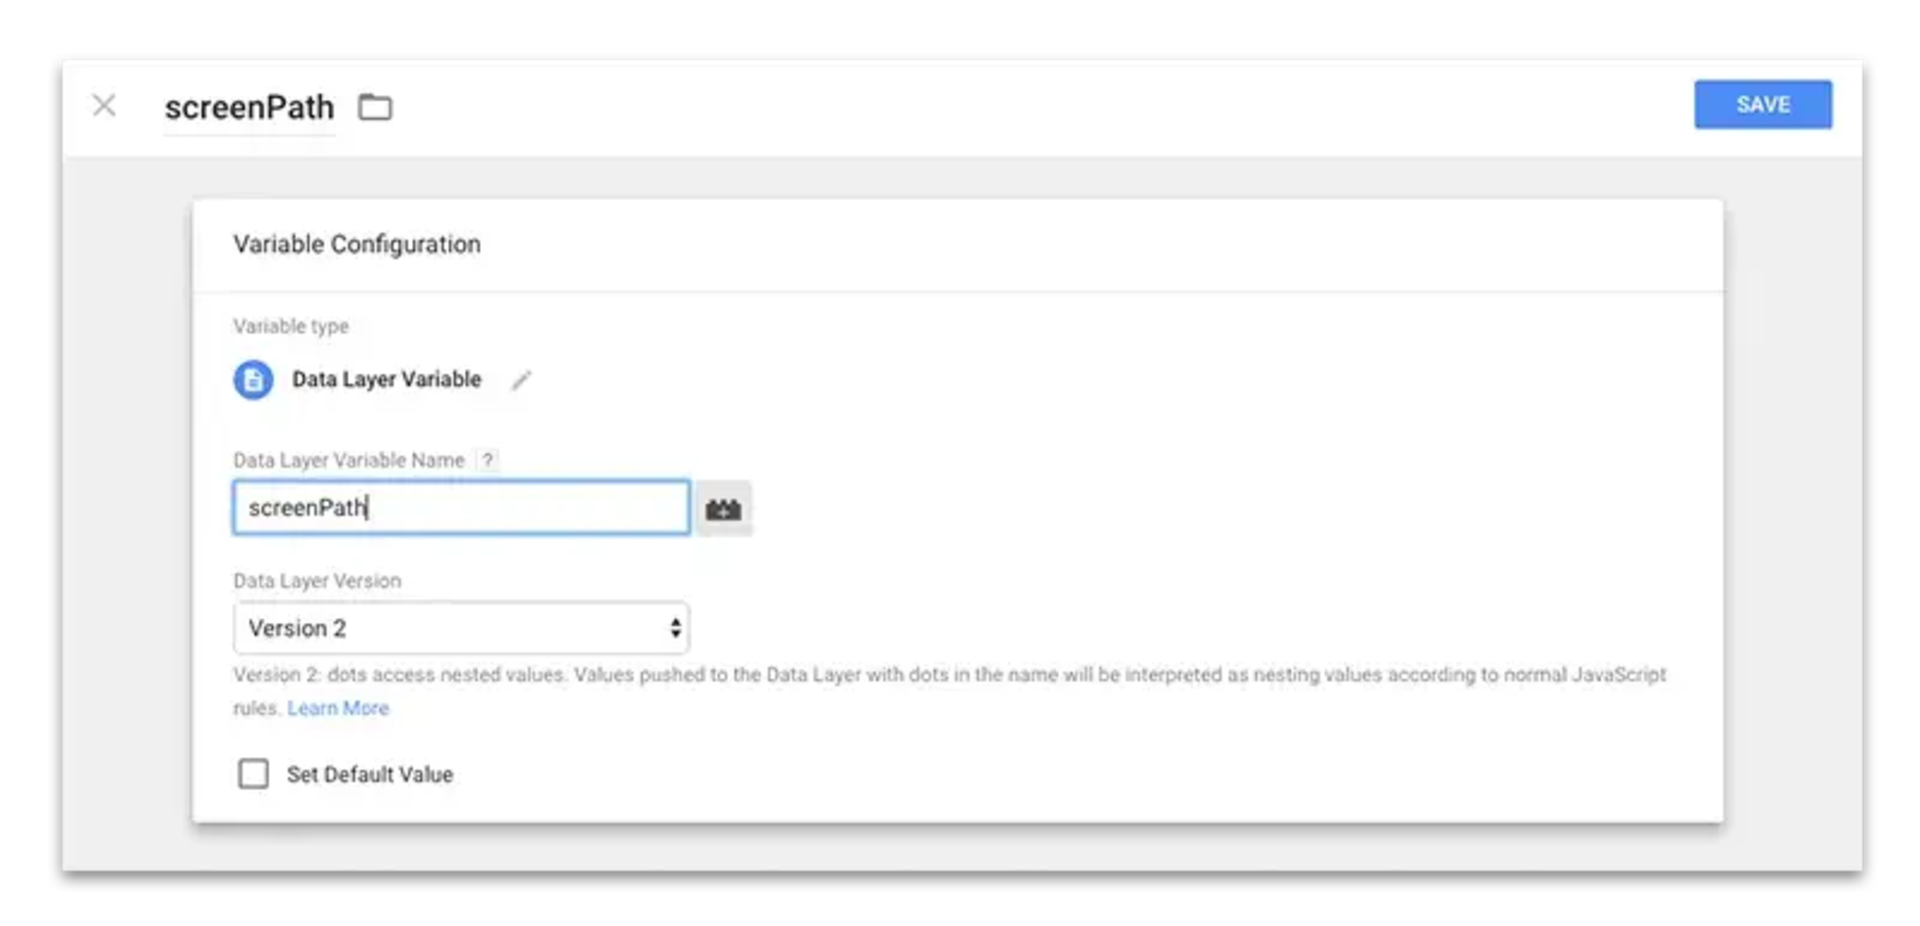
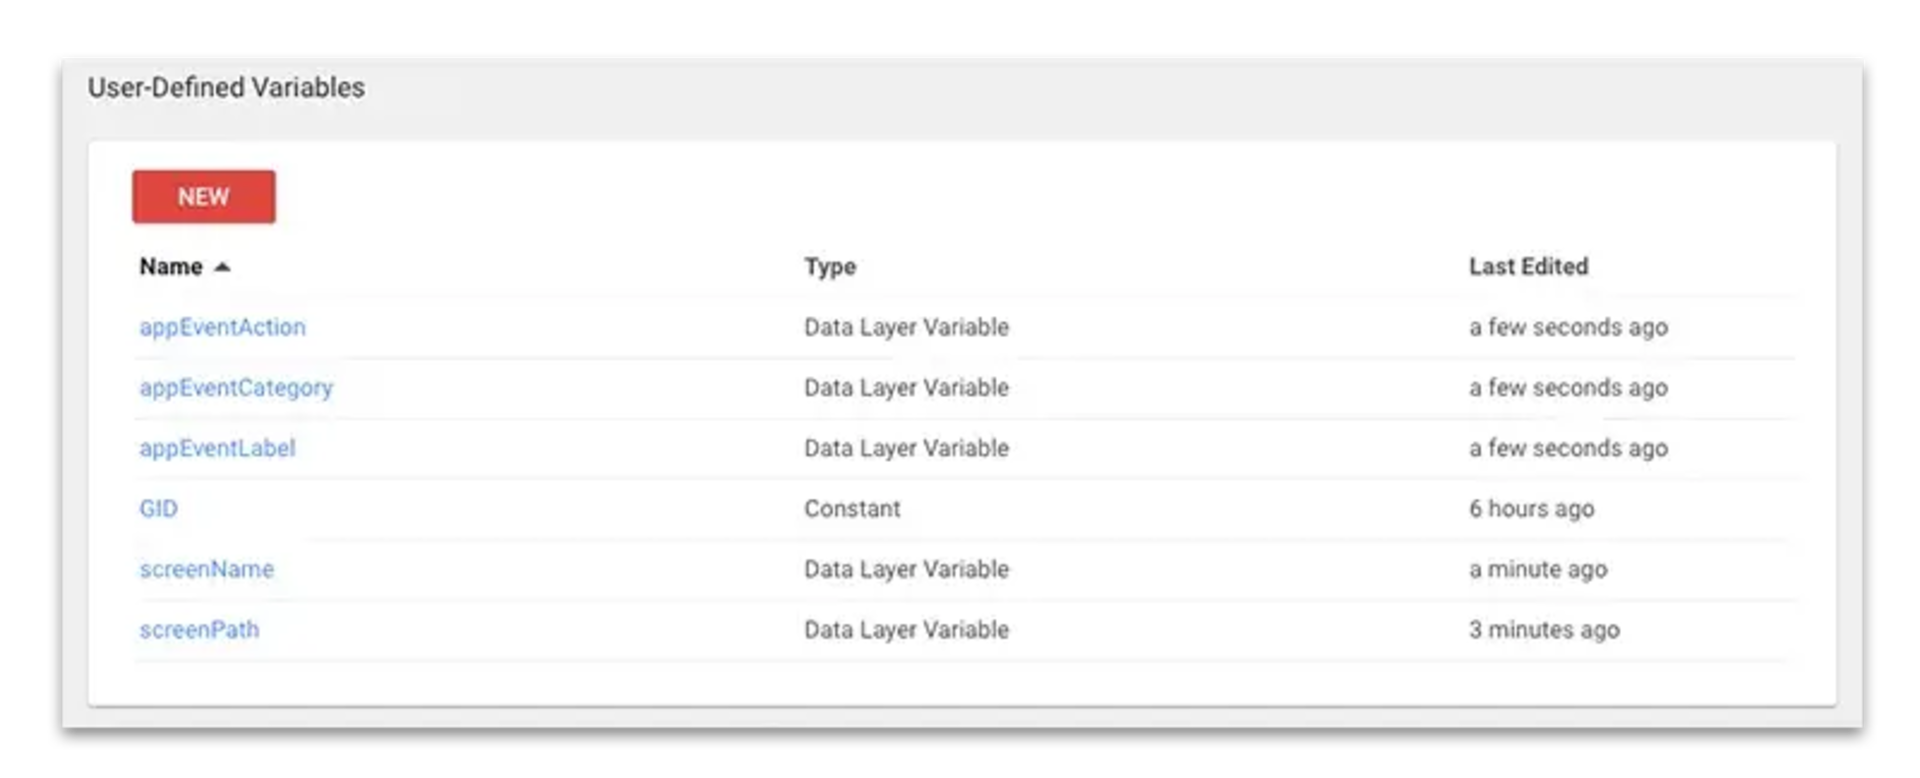
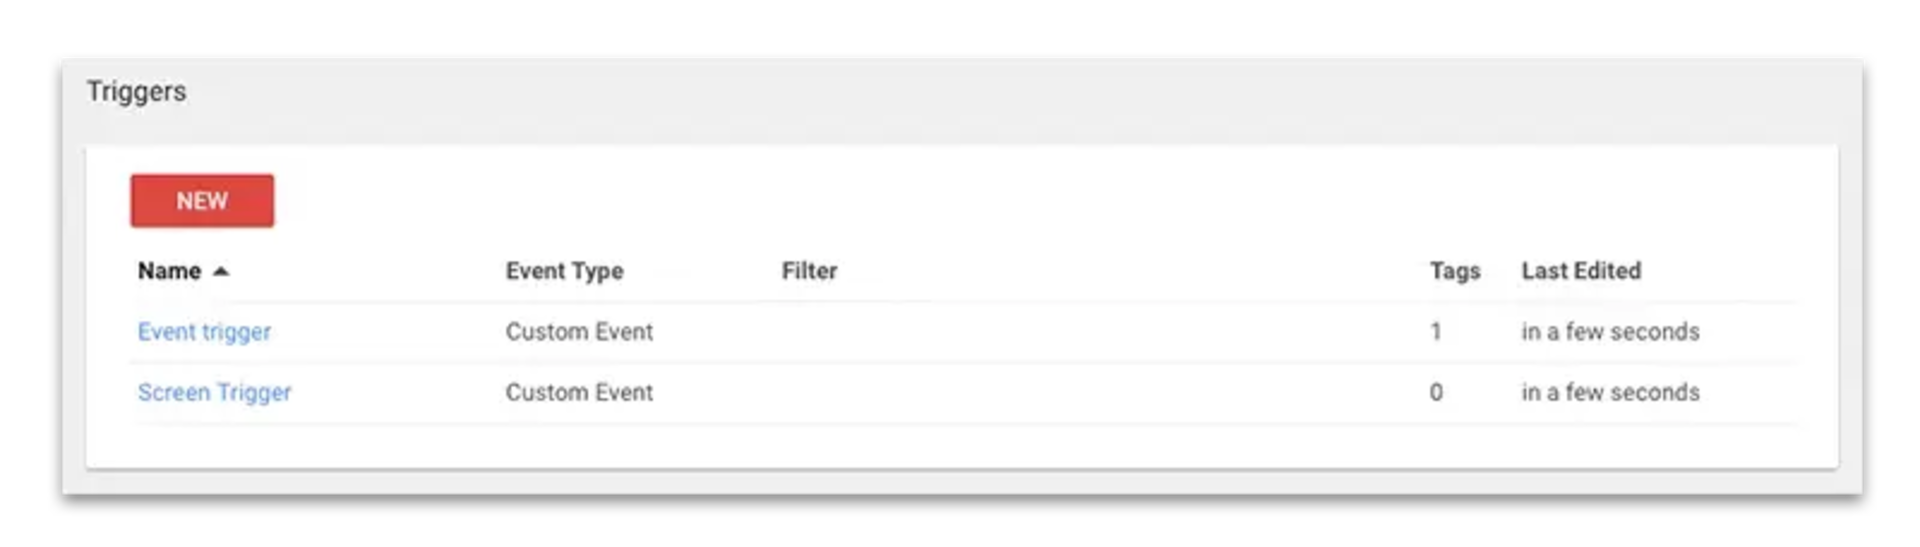
Step 5: Add the necessary data layer variables and create the required triggers
Next we will add some data layer variables that will hold our page and event info. The variables we’ll add are “screenPath”, “screenName”, “appEventCategory”, “appEventLabel”, and “appEventAction”. They should be self-explanatory.
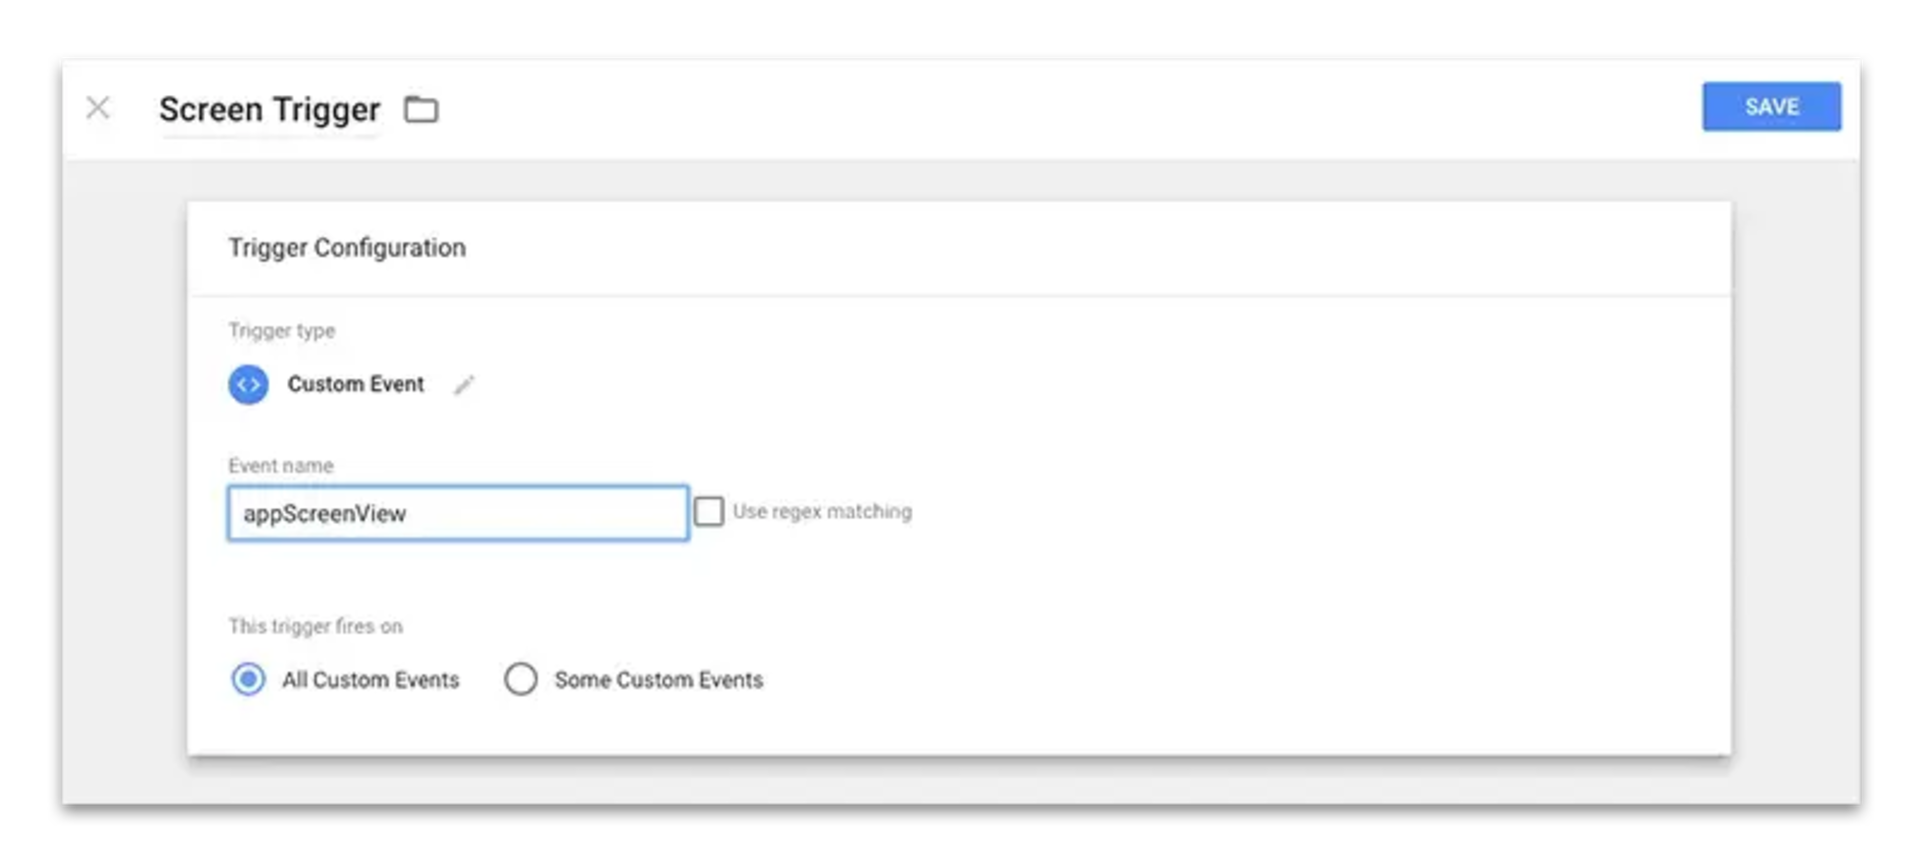
We’ll also create 2 triggers. One for sending screen views and one for sending events. The triggers will be of type “custom event” and the event names should be “appScreenView” and “appEvent”.
Step 6: Create the Google Analytics Measurement Protocol Tags
Now we will need to create 2 Google Analytics Tags based on the Measurement Protocol. I will not go into detail about the Measurement Protocol itself, you can find the full documentation here. For this example all you need to know is that it is a way to send data to Google Analytics using a simple GET request. To help you out, Google also has a simple tool to create, validate and test a hit. If you’ve never worked with the measurement protocol I suggest you the hit builder tool to create your hits.
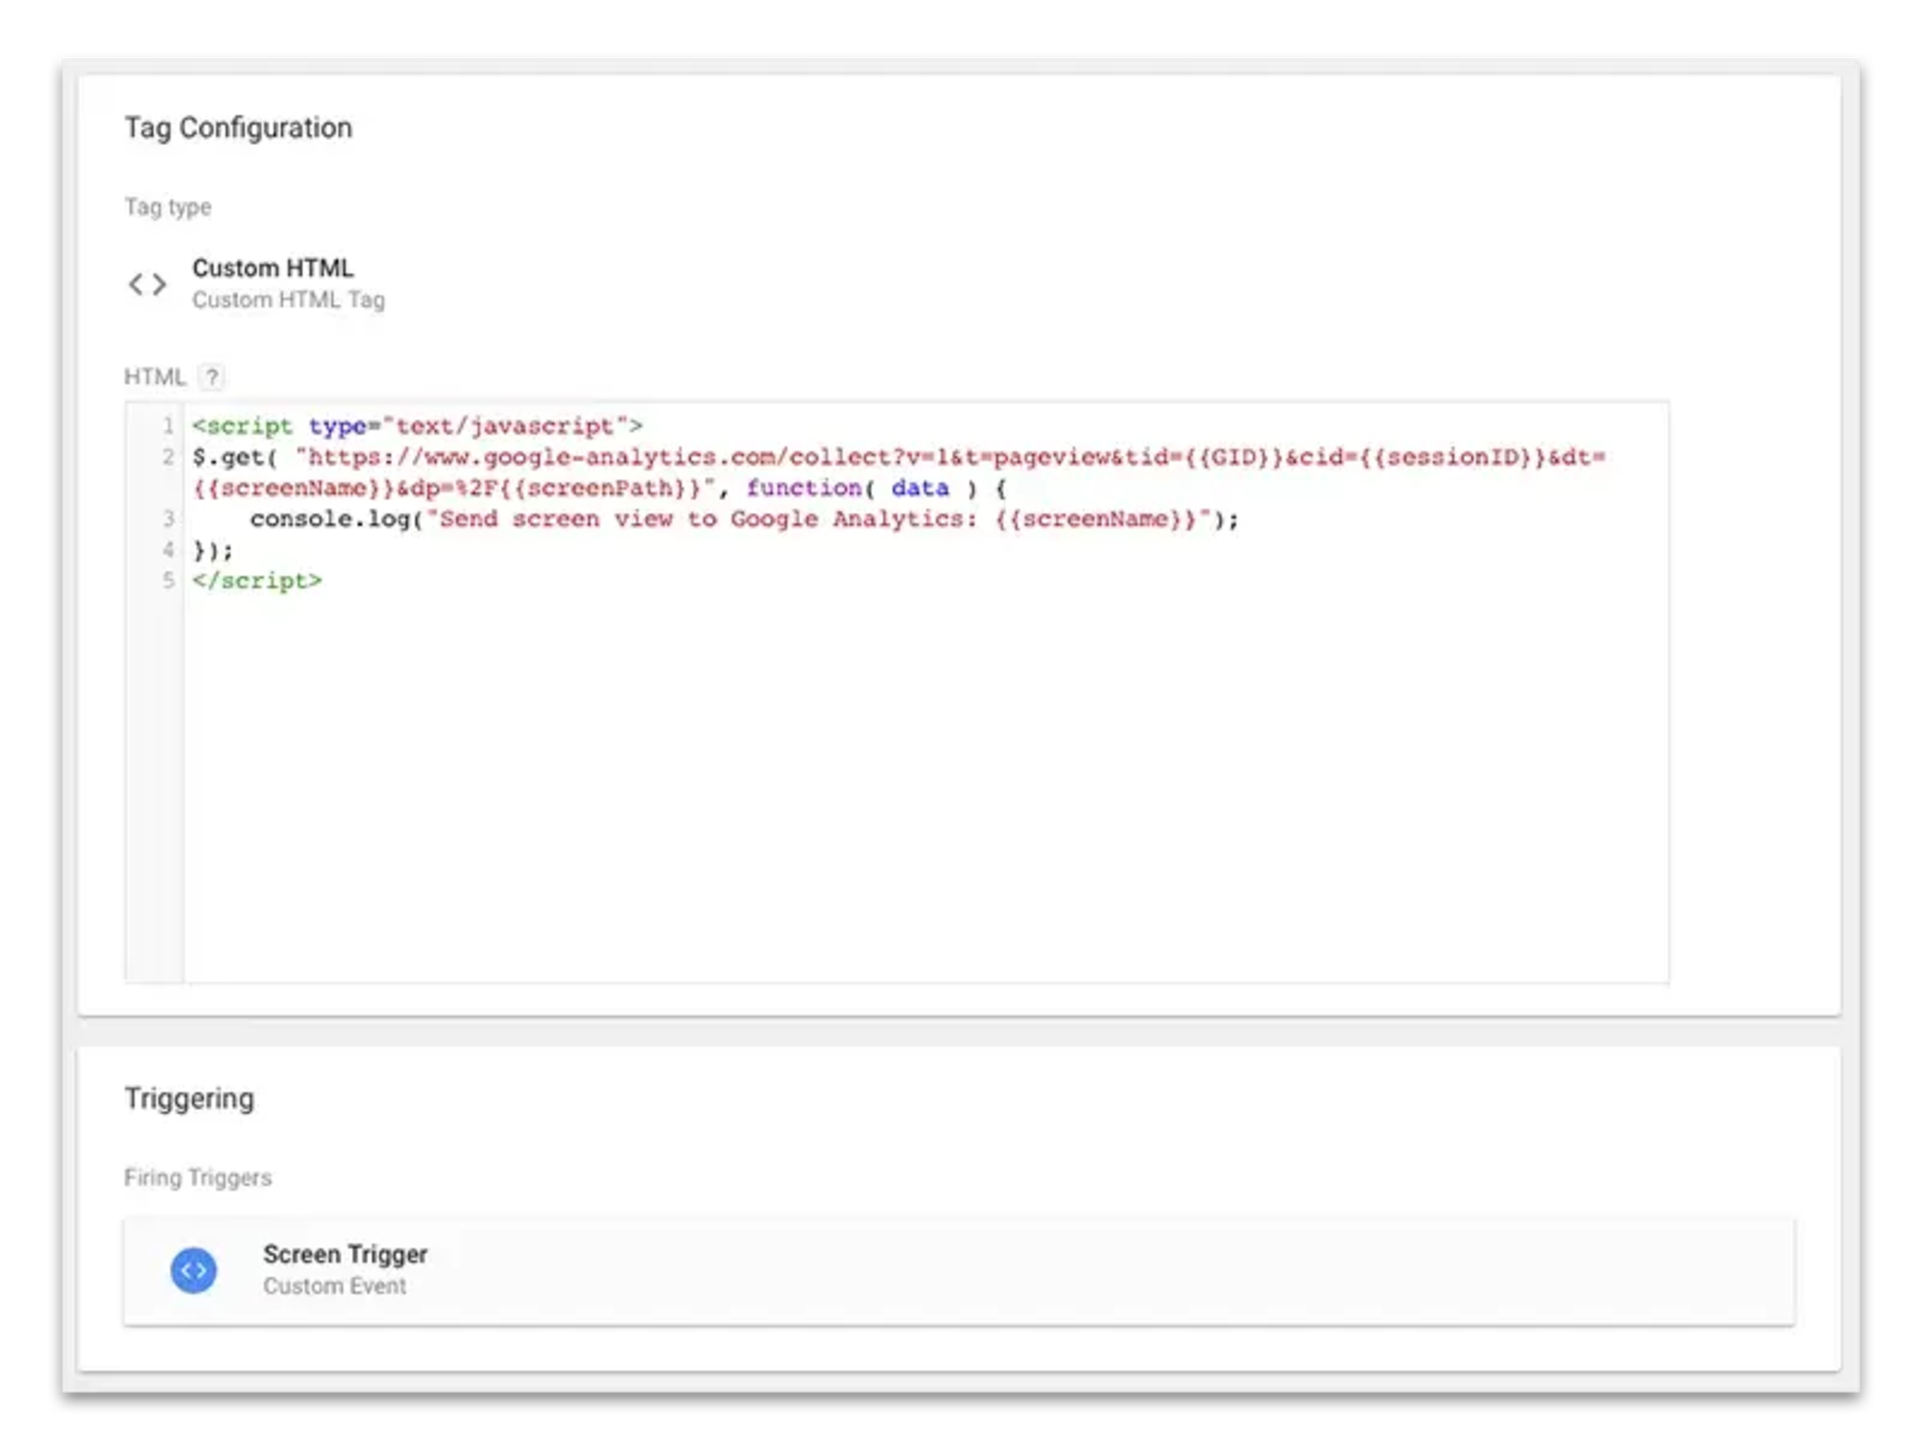
The first tag will be used to send screen views to Google Analytics. We create a measurement protocol hit using the hit builder to send the screen name and screen path, and replace the parameters with data layer variables. JQuery is used to send the actual GET request.
Use the following snippet to send a screen view and create the tag that fires on a ”appScreenView” event:
$.get( "https://www.google-analytics.com/collect?v=1&t=pageview&tid={{GID}}&cid={{sessionID}}&dt={{screenName}}&dp=%2F{{screenPath}}", function( data ) {
    console.log("Send screen view to Google Analytics: {{screenName}}");
});
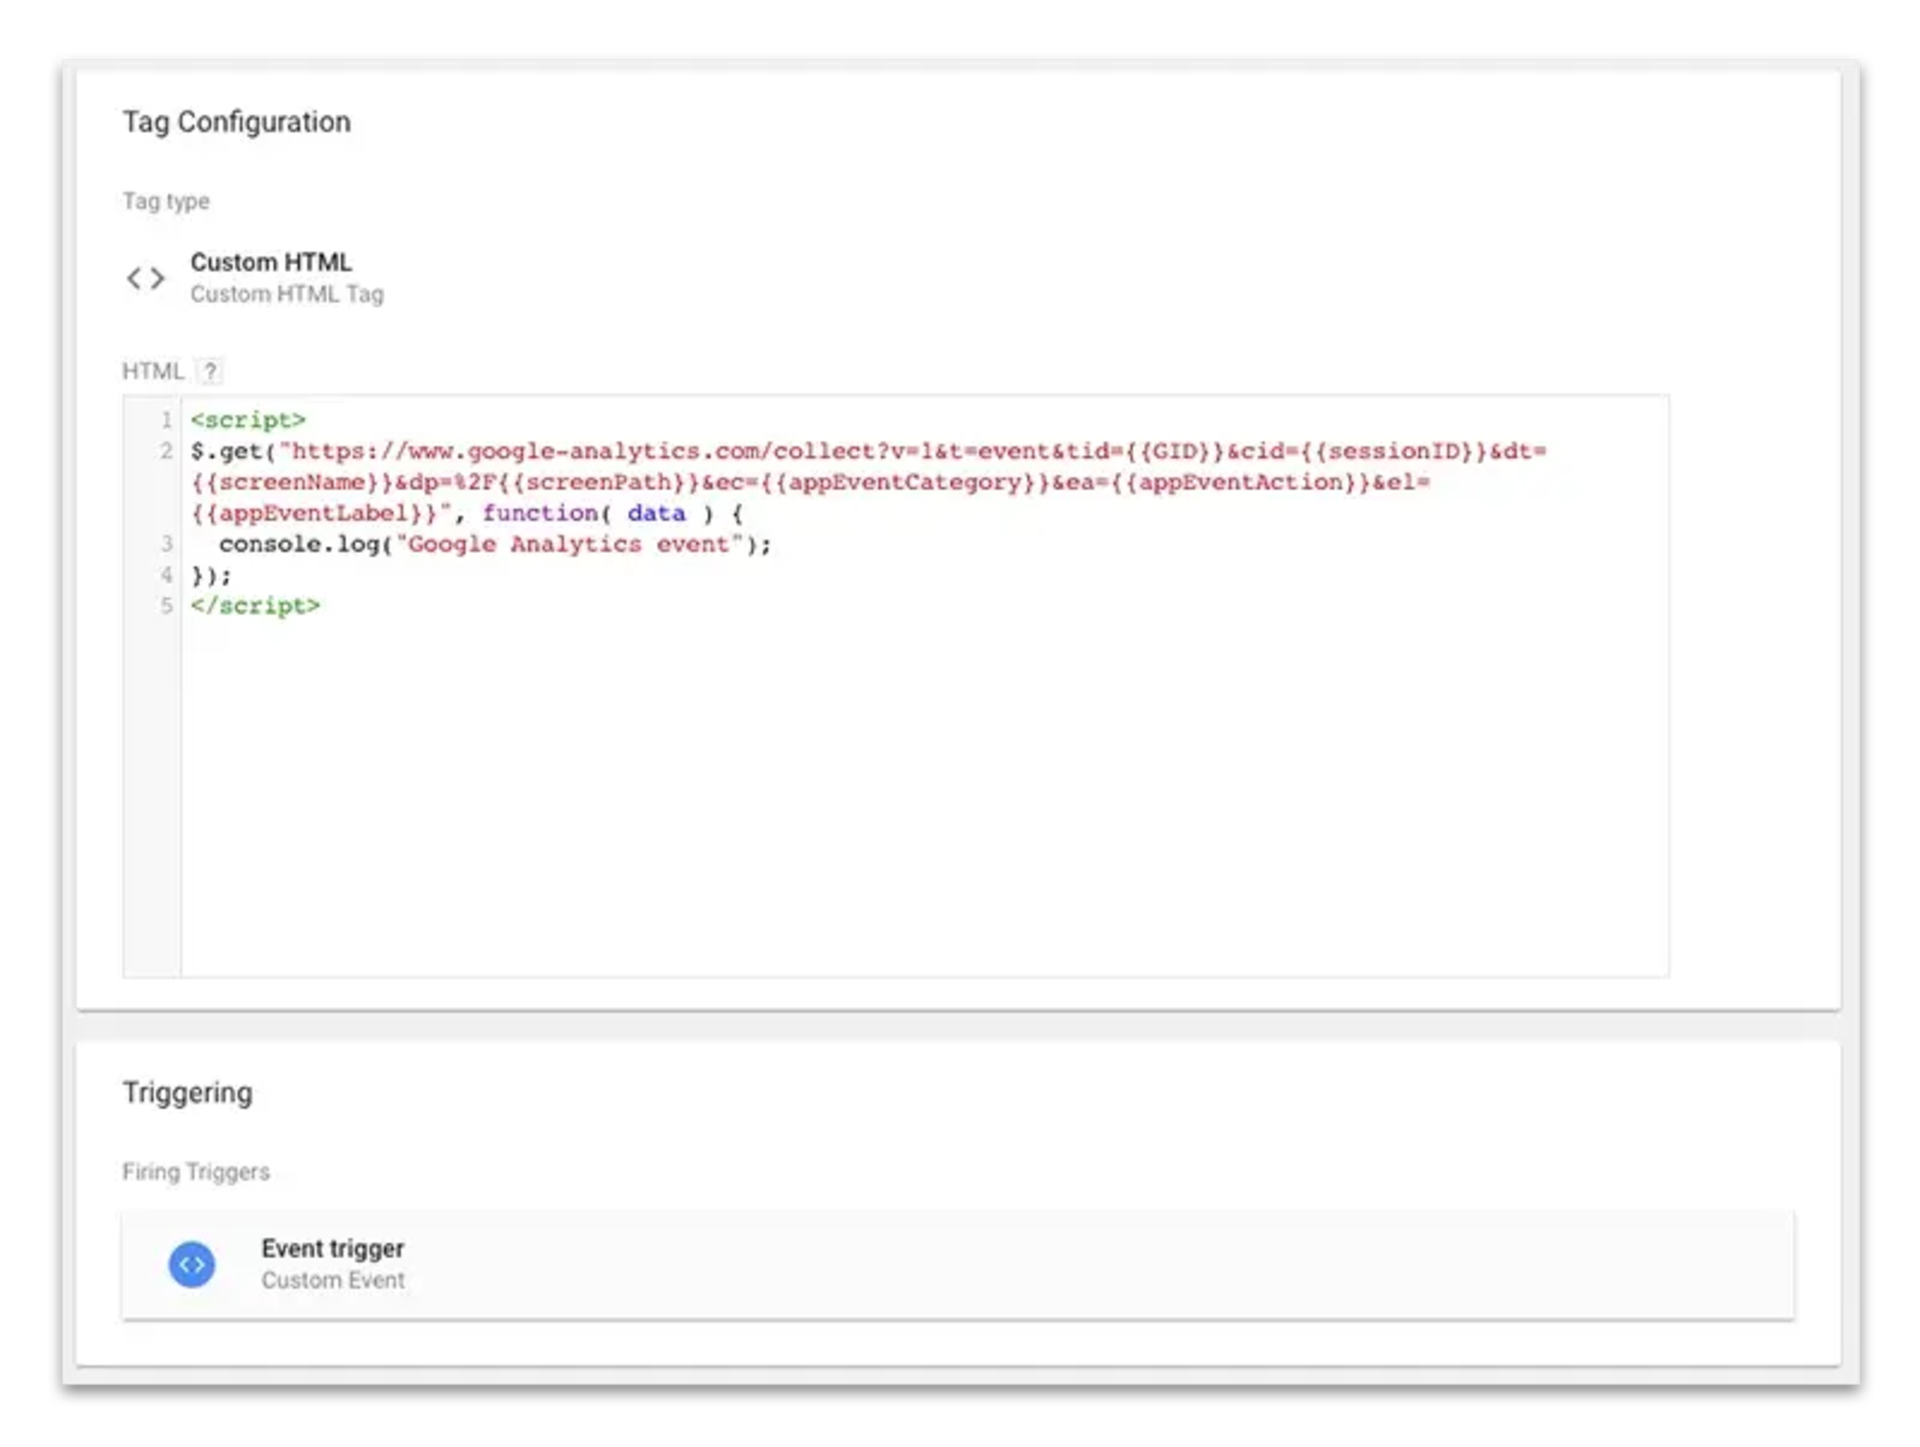
We now repeat this process to create an event tracking tag:
$.get("https://www.google-analytics.com/collect?v=1&t=event&tid={{GID}}&cid={{sessionID}}&dt={{screenName}}&dp=%2F{{screenPath}}&ec={{appEventCategory}}&ea={{appEventAction}}&el={{appEventLabel}}", function( data ) {
  console.log("Google Analytics event");
});
Step 7: Populate the data layer in your Ionic / Cordova app
To actually trigger our tags and send the correct data to Google Analytics our app needs to populate the data layer. This is done by interacting with the javascript data layer object. (full documentation can be found here). For our quick example I’ll show you how to send a pageview and send an event from an Ionic component. Obviously you can to this from anyplace in your app.
import { Component } from "@angular/core";

declare var dataLayer: Array;

@Component({
    selector: "page-about",
    templateUrl: "about.html",
})
export class AboutPage {
    onScreenLoad() {
        dataLayer.push({
            screenPath: "about",
            screenName: "About Us",
        });
        dataLayer.push({ event: "appScreenView" });
    }

    onButtonClick() {
        //send event
        dataLayer.push({
            appEventCategory: "about",
            appEventAction: "click",
            appEventLabel: "about button",
        });
        dataLayer.push({ event: "appEvent" });
    }
}
Step 8: Adjust the sandbox rules
The last thing we need to do is adjust the sandbox rules so our app doesn’t block requests to the Google domain. Add the following line to your config.xml to allow all outgoing request. Off course you can edit this to be more restrictive if you want.
<allow-navigation href="*" />And that’s it. This should get you up and running with Google Tag Manager and Google Analytics for hybrid apps.